Draft - vim Introduction and My Setup
Note: This blog entry is in a draft state and given my laziness likely to stay that way indefinitely.. In particular the "trying to program" bits at the end are just notes of how I want to flesh them out. Maybe I'll write them up at some point -- if I do they'll probably be separate posts and I'll edit this one to link to them.It seems everyone who uses vim eventually winds up writing something like this... Out of the box, vim (and its long-ago predecessor vi) are very capable for their primary purpose: editing text. But vim has a powerful extension system, making it capable of so much more. In addition, the out of the box stuff is very configurable, so even if you install no new plugins, you can spend a lot of time tweaking the settings to get what you like. As such, this is my vim setup. Your preferences may very well be, and may very well should be, different.
I'm writing this sort of in mind of presenting to an audience of programmers who are interested in getting into vim, but it may be useful for current vimmers too, thought they can probably skip the whole long first section (skip to Changing the Defaults). (I did eventually present a summarized version of this to some coworkers on my last team for a lunch-and-learn, it helps to have a live vim session open to showcase immediately what's happening. Maybe a video or some images will make it here one day..)
Anyway we'll be starting with basic stuff about how to use vim, including a small history of how I got into using vim, and proceed from there. We'll go over some plugins I use and like and even mention some I haven't really used but think are potentially useful if your preferences or circumstances differ. Along the way we might make comparisons to IDEs. (My old day job was mostly in Eclipse, and it and its forks over the years are what I'm most familiar with, though I have used old versions of IntelliJ, Visual Studio, Sublime, VS Code, Atom, emacs, spacemacs....; though not all in a professional manner or long enough to really get into them.)
To make sure nothing depends on hidden local context, I'll start with a fresh VM of MX Linux 19.2. Why MX? I was going to use Mint, but MX is number 1 on distrowatch right now, so I might as well give it a spin. It's debian-based so if I have to apt-get anything, it should be pretty consistent with other such distros. If you want my recommended Linux distro, and an excuse to edit a bunch of stuff with vim, learn how to install Gentoo.
Getting Started
Vim as Notepad
Though vim has a standalone GUI version that works just fine (gVim), we'll only focus on the terminal vim here.
Some systems alias 'vi' to 'vim', so when you type either one, you'll launch it. Get in the habit of typing 'vim' to make sure, though, or explicitly alias it yourself. On MX at least, there is a difference. Sometimes the difference is to still use vim but in a 'compatible' mode -- i.e. all/most of the niceness that has been developed since the 70s (when vi appeared) turned off.
It's important to read text that programs provide to you. If you stop and read now, you'll learn a little factoid "VIM - Vi IMproved", and see some helpful commands. In particular, "type :q<Enter> to exit". Can we retire the tiresome 'joke' about not knowing how to exit vim now? You can also type :help to access vim's internal help, this might explain things or help you faster than searching online.
Type :q now to try out exiting. Now on the command line run vim t. You'll see a different output now from before, a blank screen with a column of tildes and at the bottom it says "t" [New File].
Congrats, you've just opened a file for editing, and it tells you it's new.
One of the things that makes vim unique from other editors is that it has modes. By default (remember, you can change all defaults) you are started in command mode -- you will also see this technically referred to as normal mode. As you might guess, this is for entering editor commands -- like copying or pasting. If you just want to type in text, or edit text in an existing file, you need to change into insert mode. To do that, you issue the command i. (There is no colon, like there was for quitting, just type the letter i.)
If you accidentally launched with vi t instead of vim t, after typing the letter i nothing will have seemed to have happened. On the other hand if you launched vim itself correctly, you should see the bottom of the screen change to show ""-- INSERT --", letting you know you have entered insert mode. Just one of those niceties that wasn't there in the 70s vi.
In either case, press "i" again and you'll have inserted your first character! You'll also see the flashing block cursor has advanced one space to the right, telling you where the next character will be inserted.
Press the Escape key (hereafter <Esc>) to return to the command mode (normal mode), and try to quit out. Note to read what's on your screen! If you type :q you'll get a red message that you haven't saved since you made changes. This is protecting you from closing a file without saving. But note the end, it says "add ! to override". This is a general pattern that works for many other commands. For this one, you type :q! now to force close without saving.
Open the file again, type some stuff, use the arrow keys in either mode to move around, and when you're ready, use the command :w to save (aka write) the file.
Now you can close without vim complaining. If you wanted to write and then close, you can do that by combining :w and :q with one command, :wq, but it's also available as :x. Combining commands is a pattern we'll see over and over again with vim.
So now you know enough to use vim as a notepad replacement, if all you do is edit text and don't do anything fancy like undo or copy-paste. The functionality is there of course, but in general, the keyboard shortcuts you're used to from other editors don't apply to vim. I encourage you to learn vim's idioms rather than immediately go rebinding commands. They're generally intuitive or at least have some mnemonic to them (e.g. i to enter insert mode), and as you'll see later they can chord together.
Vim commands are also unlike emacs contortions involving multiple modifier keys like ctrl+meta(aka the windows key)+alt+k+y to do something. (Why emacs is that way is perhaps an interesting tangent, but just looking at a picture of the Space Cadet Keyboard will explain a lot, coupled with the fact the keyboard didn't send key-up events making chording impossible.)
Using vim as vim -- important vim commands and concepts
One of the draws of vim, and a big one that got me as a lazy teenager, is that you really never have to move your hands to touch the mouse and go back and forth. Furthermore, you don't ever have to stretch your fingers very far from the home row, the exception perhaps being the escape key, but that can be changed as we'll see later. "Far from the home row" includes keys like the arrow keys and home/end/pgdown/pgup, the latter of which may even require a function key to be held if using a small laptop.
Instead of using the arrow keys to move around, I encourage you to be in the habit of returning to normal mode (command mode) when you're not actively entering text, and use the home row h, j, k, and l keys to move around single places. (You'll eventually get used to more powerful commands to move further.) h is the furthest left of these, and l is the furthest right, so naturally pressing h moves the cursor left and pressing l moves the cursor right. Pressing j moves the cursor down one line, pressing k moves the cursor up one line.
You might have typed a long sentence before to see what vim does with word wrapping. If not, type one now. The default is line-wrapping. You'll notice that if you use j and k, or even the arrow keys, you will not jump to the above/below wrapped line, but to the actual line.
Type the command :set nu and you'll see line numbers for each line. Type :set nonu to turn them off again. This is a general pattern, being able to toggle things on and off by setting 'foo' and 'nofoo'.
If you want to move up and down a line within a wrapped line, prefix your j or k (or up/down arrows) with 'g'. That is, in normal mode, the sequence of key presses and releases gj will move your cursor down.
'g' is a general prefix to many movement commands, I think of it like 'go'. You can for instance type g0 and g$ to go to the home and end of the wrap-sensitive line. To ignore wrapping, drop the little 'g'.
o outputs a new line below your current line and puts you into insert mode. Very handy. Add some lines to your file. If you want to jump to the beginning of the file from anywhere, use the sequence gg.
If you want to jump to the end, use G. This is another common pattern, where the capital letter version of a command will do something related (not necessarily opposite) to the lowercase version. Capital O for instance puts a new line above, instead of below, your current line.
Reference/Cheat sheets help for getting started. Here is one I used for a long time. It was on a coffee mug I got from thinkgeek...
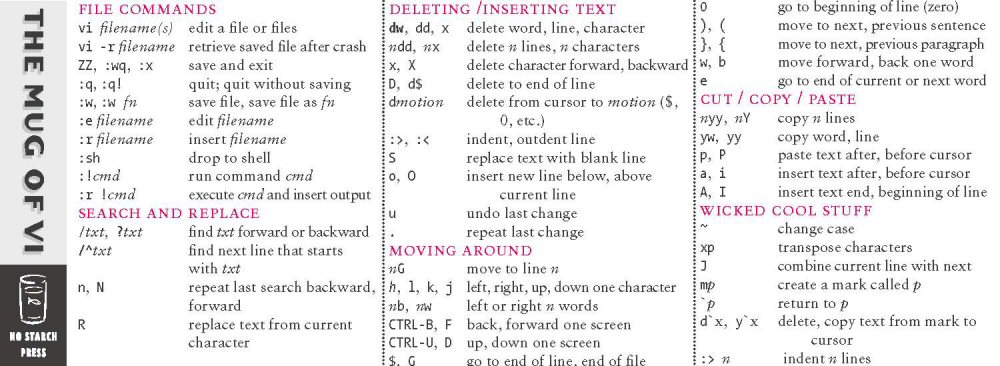
Who can resist the allure of "WICKED COOL STUFF"?
We see in the section "MOVING AROUND" that if we put in a number n before our G command, we can specify a line to go to, instead of just the end line. You can even use 1G to jump to the first line, instead of gg.
It's worth it to go through each command in this cheat sheet at least once. Eventually you won't need the cheat sheet. Anyway I'll summarize some of the concepts in play for each section.
Files and buffers
Like most editors more advanced than Notepad, vim can handle editing multiple files at once. How vim does this is through the concept of "buffers". If you still have your t file open from before, that's good. Use the command :e other -- note you may get yelled at about saving first, so do that, then run the :e command.
You're now presented with a blank screen again and "other" [New File] at the bottom, just like when we first opened t. Anything you do in this screen only applies to the new "other" file.
If you type something and save, then quit out, vim closes. You can verify you have two files. But what if you didn't want to close vim entirely, but just the file "other", so you can get back to "t"? Relaunch vim opening t for edit, re-open other for edit with :e. Instead of typing :q, type :bd -- buffer delete. This deletes the buffer (the file is still there on disk!) and returns you to the last one. You can open "other" again after this.
If you just want to switch buffers, use :b name-of-file. If you make modifications, you'll be yelled at about saving, so you can save before switching, or use the ! to override and switch anyway. You can switch back though, and your changes are still there -- you didn't close the buffer.
You can also use :e to just reload the file, and it will reuse the buffer if it already is loaded. But note if you do make changes, and don't save, but open a new buffer anyway with :e!, then switch back to the first file, your changes will be gone.
Later on we'll see a plugin that makes working with buffers a bit nicer, as well as make sure we have a "complete" vim (MX's doesn't seem to be complete) with all the usual bells and whistles turned on so you can tab-complete buffers and filenames and so on.
Vim includes the concept of "tabs", which are like collections of buffers. Type :tabnew to open a new tab, or :tabnew somefile to open a new tab and open a buffer for that new file. The nice thing about this feature is that now you have tabbed files on the top of the editor. You can move around with :tabprev and :tabnext and close a tab with :tabclose. I would encourage you not to get used to this feature, nice as it seems, and instead get used to working with buffers with the support of plugins. I used tabs for years, there's nothing wrong with them per se, but once I got used to the buffer way I haven't gone back.
Vim includes the concept of "windows" or "panels". These are a way of showing multiple buffers at the same time. If you quit out fully and open just one file again, typing the command :split will split your editor into two "windows" aka "panels" aka "views", with your t file open in both of them. You can now open your other file, and only your top view will change. To switch to the window below, use <Ctrl>-w j (or the down-arrow instead of j if you haven't gotten used to hjkl). Similarly for switching back up. Note if you only have two windows, you can use <Ctrl>-w w to toggle between them.
One improvement that was also true of tabs: if you type :q, only your window is closed, not the whole program.
If you type :split filename you can split and open that file in the new panel.
If you want to split vertically, you can use :vsplit instead, and use left/right or h/l to move between the left or right windows.
If you have two windows open and type :tabnew, your windows will not be part of the new tab. The windows are associated with the buffer set, and since tabs are different buffer sets, they also are different window sets. Something to keep in mind if you're going to keep using tabs.
You can subdivide further if you like. Some vimmers create a setup that very much resembles a full-blown IDE like Eclipse, where they maximize their terminal before launching vim, and have things setup to automatically open a window pane for file browsing, a window or two for editing files, another window for commands, another for displaying things about the current file like a list of methods...
If you actually want to quit vim and not have to quit every window or tab, :quitall is there.
The last 3 commands of the cheatsheet show something really cool about vim -- easy integration with your command line. The first one, :sh, "closes" vim and returns you to the shell, where you can run commands, but when you "exit" the shell e.g. with ctrl+d, you return to vim. This means if your system policies forbid sudo on some command, but don't forbid sudo on vim, you can launch vim with sudo and then implicitly run any other command as root through this mechanism.
You can also just run a command without having to go to a shell. :!ls will do the file list, then prompt you to enter or type a command to continue (return to vim). If you want to paste the output of ls into your current buffer, use :r !ls. Cool no?
Search and Replace
No need to stretch your pinky to hit ctrl+f. To start searching for something, just type / and then your search string. Vim will wrap the search around to the start of the file by default (and tell you). When it finds a hit, you can search again for the next match after that by using the n command. The N command searches backwards.
Instead of a simple string, you can also search with a regex.
The cheat sheet highlights the R command -- this puts vim not into Insert mode, but into Replace mode (as it says at the bottom). This is similar to how the Insert key works on your keyboard. Indeed if you hit the insert key on your keyboard, this will toggle you between Insert and Replace modes in vim.
We'll go over some settings that make searching a bit nicer later, but one to look at now is: how can we make our search results highlighted? And here we come to the first area where our vim the distro provided is not "complete".
Running sudo apt-get install vim installs "vim" and "vim-runtime" by default. It also suggests a few other things we'll install next, but first just do these two and you'll see at the end a message about vim.basic... why distros do this is beyond me. Anyway, these two seem to be sufficient for this demonstration. Open up your file again, and this time start searching with /something. As you type, if there's a match, you'll see it incrementally highlighted!
After your search, use the command :set hls -- this sets highlighted search on. If your search matches more than one thing, you'll see both highlighted even after the search is complete. (You can quickly jump to the next one with n as usual.)
Use :set nohls to turn highlighting back off.
Use :help hls to learn more about it, including the fact that it's an alias for the full "hlsearch" option. This opens up a new window with a documentation buffer (in this case options.txt), which is just a regular file. You can close it with :q when you're done reading, or scroll around to check out other options. There are a lot of them! (My file has 9369 lines.)
The mug is a bit misleading by showing search but not search-and-replace, instead talking about the rarely used Replace mode. I'll fix that. Search-and-replace works like sed. Use the command :s/searchstring/replacestring to look for the first match to the search string, on the current line, and replace it with the replacement (which can be empty, or use captured regex groups). If you want to replace all matches, append a /g to the end (global). Similarly appending i will make the search case insensitive.
If you want to do the search-replace over the whole file, for each occurrence, use :%s instead of :s. To add a confirmation to each match, add the 'c' flag at the end. Complete example: Replace all letter p, upper or lowercase, with q, confirming each: :%s/p/q/gic.
Undo, Redo, Repeat
Say you want to undo your last change. Just use u. Undo too much and need to redo? ctrl+r.
A nice feature of vim is that unlike other editors that just have a simple undo/redo stack, vim has an undo/redo tree. Thus you can undo a couple changes, make some new changes, and decide you actually wanted the original state before you did any undos! Basically, so long as you don't close, any state your file was in at any point in your editing session is recoverable.
The simplest way to navigate this tree is with our familiar 'g' movement prefix. g- goes to the previous (in time) state until the beginning, g+ goes to the next (in time) state until the end. This feature is really powerful, you can learn a bit more here and of course there are some interesting plugins...
Using the . command lets you repeat your last change. e.g. you might type "hello<Enter>", hit escape, and repeatedly type . to repeatedly make lines of Hello.
More installs
Before we get further, let's go back and install the recommended packages from before. sudo apt-get install ctags vim-doc vim-scripts. ctags should alias to the modern version, exuberant-ctags.
Deleting
dd deletes the current line. D deletes to the end of the current line from the current cursor position. As we saw earlier with jumping to a specific line (3G), a common command pattern is prefixing a number before a command to pass in the number as context. In the former case, the number acts as the line to jump, with the default being the end of file. Various commands also accept a number as context to mark how many times to do the action. So 3dd deletes 3 lines instead of one. 3x deletes 3 characters instead of one, etc.
Vim has a concept of "motions", things that move the cursor. (:help motion for bit more summary, :help motion.txt for the full doc.) The simple hjkl are motions, but things like moving to the end of a word (with the command e) are also motions. Many commands accept a "motion" after them, d included. So you can delete to the end of the word your cursor is on with de. This will leave you with an extra space though, because the e motion only moves to the end of the word. In contrast, the w motion moves to the next word. So dw will delete the word and the space, leaving you at the start of the next word.
Type out in insert mode "line", "from", "csv". Note if you repeatedly use w here, you'll advance from the double quote to l, then to the closing double quote, then to the next double quote, then to the f in from, etc. This might not be what you want. You can use capital W instead, and now you'll advance from opening double quote to opening double quote of each word. Similarly with going back by words, b and to skip punctuation B.
Of use to programmers is the "inner" motion that lets you do stuff between delimiters. Say you wanted to delete the text within quotes, the "from". With the cursor anywhere on the word, di" -- Delete In-between Double quote, or Inside. If you want to delete the double quotes too, da" -- Delete A Quoted string. This pattern works for pretty much everything you expect. Example:
if (foo) {

  if (bar) {

    if (array[v]) {

      go;

    }

  }

}
If your cursor is anywhere on the go line, you can delete it but keep its curlies with di{ or di}. If you are on the bar line anywhere but the final line character you can get rid of everything but the foo block. Similarly for parentheses and square brackets and angle brackets... And this also can work for XML tags. If you have <foo>bar</foo> you can use dit -- t for Tag. Note your cursor can even be in the foo opening or closing tag itself and this will still work, deleting the inner text.
If you want to delete the newline between your current line and the next line, i.e. Join the lines together, it's as easy as the command J. There will be a space though. Is there a way to make it not insert a space? Try :help J, and we see two commands below it, seeing that gJ joins two lines without inserting a space. Of course, because vim lets you type "at the speed of thought", you might simply type J and then x to delete the space character.
Cut/Copy/Paste
Without getting too much into this now, vim's copy clipboard is separated from your system's clipboard. And in fact vim can store things in multiple named clipboards. The default though is often good enough. To copy your current line, you use yy (y for yank). You can then paste your line with p, after your cursor. Capital P pastes before.
Cutting is the same as deleting -- when you delete a line, it puts it on your clipboard, so you can paste it back or somewhere else with p.
You can type v to go into vim's "visual" mode -- this lets you select characters to then perform operations on (search replace, yanking, pasting over...). You can also use capital V to go into "visual line" mode to work on the level of selecting lines instead of characters. And finally, ctrl+v will put you into a rectangular block visual mode where you can select rects of characters. Can be useful for copying a column out of a table, for instance.
In order to interact with the system clipboard, you need to prefix your yank and paste commands with "+ (double-quote plus). Unfortunately MX's vim is again incomplete, we need to install more...
sudo apt-get install vim-gtk vim-gui-common
Since your system clipboard is really part of your GUI, there's a sort of sense here... well, at least this gives you gvim if you didn't have it already. Maybe installing gvim should be the first thing one does, just to get the dependencies? It also installs a bunch of ruby stuff for who knows why. And all this extra installation has subtly changed the default behaviors on things we've seen so far (e.g. you can now type :b <tab> to see a list of all your open buffers you can switch to).
You'll know you're successful because when you start typing " and press +, you'll see both characters in the lower right of the vim screen. If you haven't installed the right stuff, you'll see the double-quote but then something else after hitting +. This flashing area is the command/chord preview and shows other chords like dit as you type them too.
A consequence of the delete-is-cut behavior is that you can type xp to transpose two characters. And a random "cool" thing, ~ (tilde) changes a character's case.
Marks
Vim buffers can have 'marks', which act like bookmarks. Simply set one with ma where a is any letter, representing the name of the bookmark. Now when you're elsewhere in the file, you can quickly jump to a bookmark with 'a (quote a) or whatever letter you named it. (This is a movement, as it moves the cursor, so it works with commands that accept movements like deleting etc.)
Recordings
Beyond the . command that repeats the last change, you might have a more complicated series of actions you want to repeat. Let's say you want to repeatedly delete everything but the first character of a line. You can record the motions for one line, and repeat them for others.
Navigate to the start of a line, then type qa to start recording in a slot named 'a' (like marks, this can be any character name, so you can store multiples). Vim will tell you it has started recording in @a. Now hit l or right arrow to go one character right, then D to delete to the end of the line, then j or down arrow to move down one line. Finally, hit q to end the recording.
You can now apply the recording by typing @a or whatever you named it. If you want to apply it 3 times, 3@a.
Folding
It's sometimes useful to hide text behind a fold. In that nested if block we had earlier, let's put the cursor on the bar line, and press $ to move to the end of the line where the open brace is. Note the closing brace is highlighted. You can press % to jump the cursor between them (works for other delimiters too). Anyway, let's use this to fold up the inner array if and go block.
To create a fold spanning the delimiters, use zf%. You can use another motion, too, like zf3j to create a fold of the current and next 3 lines. You can also enter a visual mode and use just zf to exit visual mode, creating a fold from what was selected. Anyway if you do the first one, you'll have a fold of 5 lines starting with the bar if.
You can open the fold by moving the cursor to the fold and typing zo. You can close it again with zc. Or you can use za as a close/open alternating toggle. To open/close all folds, use zM and zR. And if you forget these, there's always :help fold. You can also read there for more (like zj/zk to navigate between folds.) Finally zd deletes a fold (not its content).
Spellcheck
You can turn on spellcheck with :setlocal spell spelllang=en_us. You can then move the cursor to an error, and type z= to open a list of suggested fixes. If it's a real word, you can add it to vim's dictionary with zg (zug undoes it). And similarly you can mark a word as wrong.
Sessions
Start up a fresh vim and split the view into two windows, opening a second file in the second window. Wouldn't it be nice to save this layout and set of open files so we can just launch in this state without having to re-open, re-split, etc.? Well vim can do that too. Use the :mksession command. Now you can quit. If you list the directory, you'll see a new Session.vim file created. If you run vim -S Session.vim, it will open that session, and you'll be greeted with what you left off with the last time you ran :mksession. Note that without plugins you'll need to re-run :mksession anytime you have changes that you want to persist to the next session.
Diffing
Vim works as a diff tool. Use help on vimdiff, :diffget, :diffput, ]c [c, do dp, ctrl+w+w, diffupdate, scrollbind.
This concludes what I think are the basic concepts and features of vim, "out of the box" (barring some distro-specific things you may need to do -- Mac users getting a full vim or neovim with brew probably have to do nothing but that).
It's also sort of my litmus test for when an editor advertises "vim mode", i.e. how much of the above can it do? I use marks quite often, if it can't do marks, it sucks. Often the "vim mode" is little more than letting you use hjkl movement, which is kind of worthless on its own. I've yet to find an editor with "vim mode" that felt anywhere near as good as vim itself, while feeling quite a bit worse than the editor's default mode, so I don't use such modes.
Changing the Defaults
Like a .bashrc file, you can create a file in your homedir called .vimrc that makes sure certain settings are made when vim starts up, so you don't have to repeat them every time. For example, maybe you want line numbers on by default. You could put set nu on a line in your .vimrc file, note the lack of colon, and voila, now every time you open a file line numbers will be displayed.
I keep my own file published here so I can reference it when I occasionally need to setup a new machine. It's crufty, made up of random notes to self over the years (you can have comments, prefixed by a double-quote) and idiosyncratic commands. Some things are unnecessary these days, some things depend on things not visible in that file, ultimately you must make your own. But I'll go over some of the things you might want to steal from mine. And doing this has let me clean it up slightly, or at least document it.
Skip to line 16 (set incsearch). It and the next two lines (set ignorecase, set smartcase) are related to searching with /. The first one makes sure we get that incremental highlighting behavior we saw before in all cases. The second one lets us search case-insensitively by default, but the third option says to use 'smart case'. Basically we'll search case-insensitively, unless our search string contains a capital letter, then we match case.
The next setting, set wildmode=longest,list changes the behavior of tab-completion. For instance, if you type :e <tab>, my default in the VM initially completes it with Desktop, then tabbing again uses Documents, etc., iterating the home dir. I don't like this. To make things more like the command line, I set it to "longest,list". This has the effect of typing e and the first tab shows you a list of the directory, if you then type D and tab again you get Desktop, Documents, Downloads. Type o, w, tab, and it completes to the full Downloads/
set wildignore+=*.swp,*.fasl,*.o appends to a list of files I don't want showing up in this tab completed list.
set showcmd ensures the chording preview/command preview as you type is displayed.
set scrolloff=2 means you have 2 lines of offset for scrolling to begin. i.e. instead of moving the cursor to the very top/bottom of the visible text and moving up/down to scroll more, you move to the third/third-from-bottom line and pressing up/down at this point triggers the scroll.
Commented out, set tw=80, is short for textwidth. It tells vim to automatically insert line breaks for you when your line you're typing is longer than 80 characters. I have it commented out because I don't want it on all of the time, but it's sometimes useful locally for a specific file, and you'll see elsewhere in the file I have it set to turn on for certain file types.
set colorcolumn=120 puts a visible column at that character offset, for when you want a reminder of long lines but not an enforcement.
filetype plugin indent on ensures some further plugins will work as expected. On Ubuntu systems I used to also need to have syntax on as a separate setting; it doesn't hurt to include it.
set nohls we saw before, I don't generally want search highlights.
expandtab, tabstop, shiftwidth, and softtabstop are all related. In short, if you prefer spaces to tabs like a civilized person, set expandtab and set the other 3 to how many spaces you want to insert when you press the 'tab' key.
You can create command shortcuts/aliases with key maps. You see just below that, two commands map \tabs2 ... and map \tabs4 .... These let you type either one in command mode and that maps to the sequence specified by "...".
You can also create command shortcuts/aliases that will only work in insert mode, as I did with imap jk <Esc>. This lets me not have to stretch for the Escape key all the time. Escape still works, and you can map it to whatever other key or sequence of keys you want. For me, 'jk' comes up relatively infrequently, and it's right there on the home row with one hand so there's no effort, so it's been my preference for years. When I rarely do need to type jk, I can type j, wait a bit (the command preview on the bottom right will show j, then show nothing when the chord has timed out) and then press k.
Your maps map to commands just as you would enter them normally. So at one point I had \p mapped to i(<ESC>ea)<ESC> which would wrap a single word with parens. It accomplished that by entering insert mode, typing an open paren, pressing esc to go back to command mode, typing e to move to end of word, typing a to enter insert mode 'appending' (i.e. moved one character to the right instead of inserting where the cursor was), typing a closing paren, and escaping back to command mode.
When I used tabs a lot, I mapped \tt to tabnew and \tn to tabnext, etc. I still use \tn and \tp because of muscle memory, but they move buffers instead now.
Maps are a nice feature to alias long or hard-to-remember options or commands to something you like. For instance, the movement gwip can justify a paragraph to your text width, but I just mapped that to \justify.
You can do things for specific filetypes, e.g. for markdown files I want a text width of 80 to be enforced, so: au BufNewFile,BufRead *.md set tw=80 accomplishes that when either a new file or existing file with the md extension is read.
The three maxmem settings are there to help with opening large files, as well as the bit about large_file. (In order to assist with data recovery in the case of a crash and lack of saving, vim creates 'swapfiles'.)
I still like to prefix custom commands with \, but a more generic way is to use the meta key <Leader> which can be rebound to people's preference. By default the Leader key is the comma character.
Anyway, for the purpose of this post, the VM's vimrc is now just:
set incsearch

set ignorecase

set smartcase

set wildmode=longest,list

set wildignore+=*.swp,*.o

set showcmd

set scrolloff=2

set colorcolumn=120


"execute pathogen#infect()

syntax on

filetype plugin indent on


set nohls


set tabstop=2

set shiftwidth=2

set softtabstop=2

set expandtab


imap jk <Esc>


map \justify gwip


map \tn :bnext<cr>

map \tp :bprev<cr>
Plugins Setup
Vim has a lot of plugins. Fortunately they're pretty easy to manage these days. Of course, there are several plugin managers... But my favorite is Pathogen. When I want to install a new plugin, it's usually in a git repo, so I just git-clone it to my bundles/ folder and voila. Can easily update it or make changes to it, too.
Vim apparently has its own package system now, you might want to look into it. But otherwise we'll follow the installation instructions for Pathogen.
Vim uses a folder in home, .vim, to store lots of metadata as well as read plugin information. Before packages, you would tend to download various files and stuff them in various directories within .vim/. With Pathogen, you only need to download one such random file and put it at .vim/autoload/pathogen.vim.
Once you do that, for plugins on github that support pathogen (most do, even if they don't say so), then again all you have to do to install and start using that plugin is to clone the repo into your .vim/bundle/ directory. Very convenient.
Plugins - Generally Useful
In this section I'll cover some generally useful plugins I use in 2020, or have heard about (or even tried) that others find useful. After that I'll go through a few examples of trying to work with a project in 4 different programming languages -- C, JS, Python, and Common Lisp. We'll start with only using the plugins installed in this section, then see how each language has/hasn't unique characteristics that necessitate or at least suggest some plugins to make the experience better. Some of the plugins will be retroactively useful for other languages (e.g. linting, which we won't get to until Python.)
The plugins I use (or have listed to 'try' someday/again) I keep listed here.
vim-buftabline gives us tabs while we use buffers. It has a good section in the readme for why we want to avoid tabs.
vim-bbye gives you :Bdelete (or :Bd) to use instead of the built-in :bd, which more intelligently handles situations where you've mixed buffer 'tabs' with window panels. (In short, it doesn't mess up layouts.)
vim-fugitive -- if you work with git a lot, you'll want to use this.
vim-obsession -- vim contains a session feature, we visited it above. This plugin basically takes care of calling :mksession for you when things change (new window splits, new file buffers opened, etc.) All you have to do is remember to start things -- or setting up an automatic on-new-file command to do it for you.
vim-table-mode lets you easily create ascii tables.
FZF -- useful beyond vim, it basically is a file-finder that uses fuzzy string searching. E.g. you might type "notifTest" and it can find "MobileNotificationsPushTest.java" in some folder 8 levels deep. Make sure you read its readme for vim installation, as unfortunately it's not as simple as cloning to the bundle dir. For a similar plugin that you can just clone, which works well for smaller project sizes (especially if they're on an SSD), use ctrlp.
NERDTree gives you a file system explorer. I haven't tried it in many years and didn't find a need for it back then, and even less of one now with tools like FZF, but it's there.
Now we'll look at trying to program in a few different languages with just what we've seen so far, and introduce a few new features or plugins to make the experience a better one. To be honest though, it's more than enough as is, our predecessor programmers got by on far less.
For years I used to go around saying "vim is my editor, Linux is my IDE" -- that is, having an array of programs you use in conjunction with vim gives you more or less equivalent or sometimes better experiences than a full-blown IDE, and your raw typing prowess is going to be unmatched. But things can always be better, having stuff integrated isn't bad, and if we want to compare favorable to professionals using expensive tools, we'll definitely need to up our game at least in some areas. I think it's fine if debugging, say, is done with a separate program entirely (gdb) instead of integrated tightly with vim as it is integrated with IDEs, but vim does provide if you want that integrated option.
Trying to Program - C
Let's see what working with a large C program is like with vim. I've selected SQLite, cloning their source mirror. Basically I want to do 4 things that are a given these days in IDEs:
1. When I type most of a function name, I can have the editor auto-complete the rest of it.
2. When I'm filling in a function's arguments, I can have the editor show me how many/their names/any function documentation.
3. I can select a function and jump to its definition in another file. I can also get a list of who calls that function and jump to those locations.
4. I can run the program in a debugger and set break points, step statements.
The first two vim features we'll look at here to support this are ctags and omnicomplete.
Trying to Program - JS
The same 4 IDE desires apply to JS too. Some people think this is impossible because JS is dynamically typed. It's not.
vim-javascript, ctags.
More recently "LSP"s -- Language Server Protocols -- have started to appear for all sorts of languages. I'd like to try one for JS and see how it fares. LSPs basically abstract out the usual IDE features (including some auto refactors) and delegate them to the LSP, providing an interface for any editor or IDE to call into and make use of them. (I don't think it's a coincidence that Common Lisp development has worked this way for decades.) The father of refactoring wrote a second-edition book on the subject, switching from Java to JavaScript, to prove you don't need static typing to do refactoring, and LSP proves you don't need static typing to do certain auto-refactoring. (Historical note, the first auto-refactoring tool was for Smalltalk, a dynamic language.)
Trying to Program - Python
Same 4 IDE desires. And we'll look at linting. syntastic is a great plugin to setup linters for lots of languages that can run automatically on save. There's also an LSP for Python, though years ago I was quite happy enough with having tab auto-complete things...
Edit: I'd like to try out ALE instead of syntastic, as it fixes the biggest annoyance of syntastic -- namely Ale isn't limited to running only on-save and blocking while you wait for it.
Trying to Program - Common Lisp
This is emacs' chosen language, but I think the vim experience is fine. I use slimv, but vlime is popular too. This person's blog post offers a nice overview.
vim-sexp and vim-sexp-mappings-for-regular-people can be helpful. I don't yet code in Lisp often enough to bother memorizing all the bindings and simple '%' to match delimiters works very well. But it's worth knowing that they exist, especially if you get annoyed at certain common repetitive circumstances. Example:
(defun foo ()

  ; do whatever

  (when something

    (do-it)))
It's common to want to add a new expression at the end -- either within the when block, or within the function block, but in either case you have one or two extra )s you need to deal with. Personally I'm not much annoyed -- move to final ), x, o, type (blah)). Or inside, move to final ), move to second-to-last ), i, enter, type (blah). Similarly I could have typed a then enter to accomplish adding something outside the when but before the function ends. The sexp-mapping ">I" takes away the manual process of matching the right closing paren and entering insert mode, so it can be more convenient.
Edit: I've been forcing myself to get used to the sexp-mappings again. Another worth mentioning is ">f" which moves a form 'forward'. This is especially useful when you want to 'swap' forms, e.g. from a let binding or what have you.
Someone has made an LSP for Common Lisp, I'd like to see how it compares to just raw slime, which trivially satisfies the previously discussed constraints. Let's see in detail:
1. Typing a function name, editor auto-completes
If I type "ev" and press tab, I get omnicomplete prompts for eval, evenp, every, eval-when, sb-eval: (this is a package), *read-eval*, bit-eqv... it's a fuzzy match, which is great. If I (defun foo () nil) and evaluate it, and type f, then I get foo, for, fill, find, ...
The "and evaluate it" is a bit annoying. The way slime integration works with vim is that you're talking to the live Lisp program and asking it with introspection what names are available and where they are. If you've only typed a local function and not evaluated it, Lisp doesn't know about it, and it won't tab-complete. This isn't so bad, but is increasingly annoying when you're typing a function and have say a bunch of let bindings inside -- local variables -- and find you can't tab-complete them. What's the solution?
vim has a lot of insert-mode completions, not just the default tab-complete we have (which is usually bound to ctrl+x + ctrl+o. You can read about them with :help ins-completion. The simplest that would work here is ctrl+x + ctrl+n which matches keywords in the current file. It's text-based and file-global (rather than lexical) but gets the job done. ctrl+e will undo an insertion.
Another thing you can do is just ctrl+n and ctrl+p (without the ctrl+x) in insert mode -- this will search next and previous (so p is usually more useful) in the buffer for keyword matches. There is probably a way to combine the two completions, but I haven't figured it out. In any case hopefully this demonstrates that 1. is basically satisfied -- we have useful tab completion (including fuzzy completion, e.g. typing mvb will expand to the verbose multiple-value-bind).
2. Filling in a function's arguments, editor shows me how many/their names/function doc
Yup. If we type, picking one at random, "(make-hash-table " then slimv shows us in the echo area the lambda list. It has no required arguments, but it has many optional keyword arguments like :test whose default is 'eql. If I highlight the function in normal mode and type ",s" I can open its documentation. With SBCL it also tells me its declared/derived type information. Additionally for built-in functions I can type ",h" to open their page in the HyperSpec -- useful for, say, the loop macro.
3. I can jump to function definitions, get a list of who-calls and jump to those locations
Yup. If I want to see how defparameter is implemented, I just type ctrl+] on it like normal. This jumps me to SBCL's source code, macros.lisp. Jumping around further you can eventually find %compiler-defvar and discover that yes, vars made this way are proclaimed to be "special" (which lets them be dynamically bound). If I'm in my own home.lisp and want to jump to make-foo, same thing, opens foo.lisp. Having reached make-foo, I can type ",xc" to ask who calls.
This works for built-in things too, even if it can be a bit slow sometimes. But let's see who calls the built-in 'floor. Pretty much immediately I get back 160 things printed into the REPL. They tell me what function is calling it, what file (if it knows), and what line number (if it knows). The line number isn't always accurate... Anyway this is nice and all but I'd like to jump to that location. slimv doesn't do this on its own, but that's because vim supports it for us. Highlighting the filename and typing "gf" in normal mode will open the file in the buffer. Typing "gF" will open it and jump to the line number, it's a smarter file open.
The downside is that it opens in the same window as you had the REPL buffer. Often this is fine, you just wanted to see how it was used, so you jump and find it. Satisfied, you can jump back to the REPL buffer with ctrl+o. Or if you're using the smarter buffer plugin mentioned before, you can :Bd to delete the buffer and restore the REPL and it scrolls back to the bottom...
If this bothers you, a convenient plugin exists to swap buffers between windows. See vim-windowswap. With it, you can write your own jumper for this situation, let's call it \jf for jump file:
map \jf gF<esc>:call WindowSwap#EasyWindowSwap()<cr><C-w>w:call WindowSwap#EasyWindowSwap()<cr><C-w>w<C-o><C-o><C-w>w
You can run each step on its own to see how it works. First we gF which loads the file at the line number in the window previously used for the REPL, then we call window swap to mark the current buffer in the window for swapping. ctrl+w then w switches to the other window. Calling window swap again swaps the top and bottom buffers -- effectively moving the newly opened file into the top window area. We swap back to the window intended for the buffer, and restore it with two ctrl+o's, finally switching windows again to be back at the newly opened file. Maybe you want to ,- to clear the REPL from time to time too instead of swapping back and scrolling down...
There are many other cross-referencing features available, but unfortunately they all fall under this suboptimal UI. Still, it's workable.
4. I can run the program in a debugger and set break points, step statements.
Yup. slimv does 99% of what's shown off in this series (may require internet archive if site is down). Because of Lisp's powerful condition system it's even better. In your normal course of programming you can make mistakes and fix them as you go. Additionally you can ",i" to inspect any bound symbols and their sub-structures for their data, modify it at will...
Bonus: I'd like to have some refactoring support...
Some people think you can't refactor without static types and a powerful IDE. This ignores several things. First is that the popularization of refactoring began with Smalltalk (dynamic types). Second is that if your language allows introspection like Java then you can't in general guarantee you've found everything because someone might have done something odd with string concatenation to build up a class or method name used reflectively. Third is that the definitive book on Refactoring by Fowler got a second edition using JavaScript in part to dispell the notion. The jedi plugin for vim also shows it's possible in vim.
Nevertheless I think the refactoring experience is better in Java and Eclipse. The tools to do nice refactoring in vim + slimv are there (much more there in emacs), but they haven't been combined yet. For example, I have an image class that contains slots width and height. I do a bit of work using slot-value, then I decide I should just make an accessor. I initially name them w and h and even export them to other files. Later I want to use the fullnames, width and height. The cross referencing will tell me all the places that call these accessors in the normal way, and I can then go one-by-one and change them. But it'd be nice to do this automatically, even nicer to have the usual vim convenience of optional step-by-step and confirmation.
Bonus 2: namespace things.
Clojure has a neat project called Slamhound, that works well in vim too. Basically it gives you something approaching the Java experience. You know the class name of something, like MyFooBar, but not exactly what namespace/file it's in. So you type MyFooBar, and ctrl+space to auto-import it into the current file. Slamhound does the same thing -- I set it up to scan the current buffer for unknown symbols and then try to find them in the classpath, on success it then automatically imports and adds to the namespace form at the top of the file. Something similar for Common Lisp would be a dream -- we can already tab-complete and apropos to find things, but then once found it'd be nice to automatically update the defpackage form the file is using to automatically import/use the symbols. Similarly, it'd be nice to highlight a symbol and with a single command automatically add it to the :exports list of the package. Super bonus points if there's an option to go update any references to that-package::formerly-private-symbol used elsewhere to either that-package:formerly-private-symbol or just formerly-private-symbol if that package was :use'd. Extending this to ASDF somehow could be useful too, though there is a lot of complexity there and ASDF offers certain ease-of-use things on its own to consider in larger projects where new files get created frequently.
Other plugins I like
vim-surround takes those inner delimiter deletion examples and puts them on steroids, letting you delete/manipulate/add delimiters/surroundings in a nice general way. It's most useful when you need to edit a bunch of HTML. Don't forget to install tpope's vim-repeat while you're at it.
vim-rooter -- vim's "working directory" depends on what buffer you have focused. Sometimes this is fine, but often you want to be working from a "project root" (and this plays nicely with fzf/ctrl-p).
Posted on 2020-09-25 by Jach
Tags: programming, vim
Permalink: https://www.thejach.com/view/id/376
Trackback URL: https://www.thejach.com/view/2020/9/draft_-_vim_introduction_and_my_setup
Recent Posts
2026-05-02
2026-02-13
2026-01-06
2025-12-31
2025-11-10